The Best Homemade Repeater Recipe
What You’ll Love About This Recipe
This homemade repeater recipe is perfect for anyone looking to boost their device’s signal with a simple, DIY solution. You’ll love how easy it is to put together, even if you’re not tech-savvy. Plus, it’s cost-effective, saving you money compared to store-bought options. Finally, you can customize it to fit your specific needs, making it as strong or as compact as you want. It’s a fun project that rewards you with better connectivity in no time!
Recipe
Intro:
A repeater is a device used to amplify and retransmit signals, commonly used in radio communications. While commercial repeaters are available, building a simple homemade repeater can be a rewarding DIY project for hobbyists.
Ingredients:
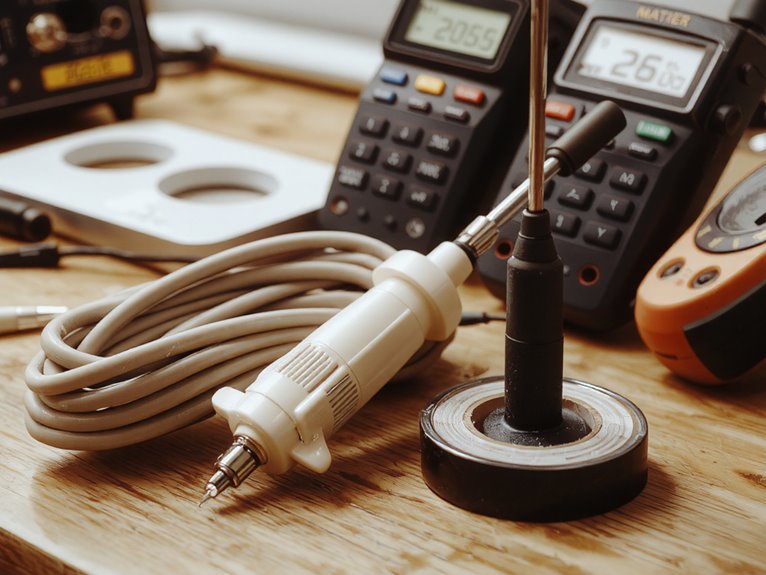
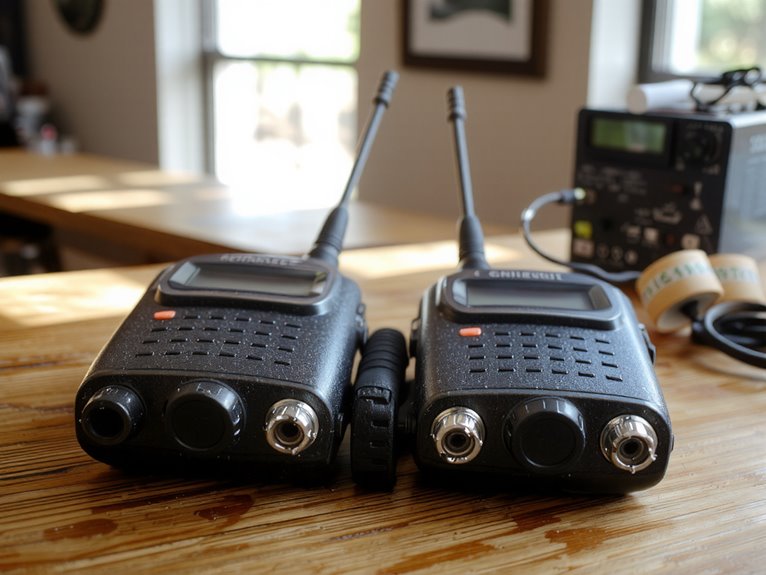
- 2 handheld radios (same frequency band)
- Coaxial cable (appropriate length)
- Antenna (dual-band if possible)
- Power supply (12V recommended)
- Soldering iron and solder
- Electrical tape or heat shrink tubing
- Connectors (PL-259, BNC, or SMA, depending on radios)
Instructions:
- Prepare the Radios: Verify both radios are set to the same frequency band and have matching connectors.
- Connect the Antenna: Attach the antenna to one radio using the coaxial cable and appropriate connectors.
- Link the Radios: Solder the audio output of the first radio to the microphone input of the second radio. Secure connections with electrical tape or heat shrink tubing.
- Power Supply: Connect both radios to a stable 12V power source.
- Test the Setup: Transmit a signal from a third radio to check if the repeater retransmits correctly. Adjust audio levels if necessary.
Notes:
- Confirm compliance with local radio regulations.
- Use a duplexer if operating on a single antenna to prevent feedback.
- Keep cables as short as possible to minimize signal loss.
Equipment:
- Soldering iron
- Multimeter (for testing connections)
- Wire cutters/strippers
Time:
- Prep time: 30 minutes
- Cooking time: 1 hour (assembly and testing)
Cuisine: N/A (Technical DIY project)
Serving: N/A (Single-unit setup)
Nutrition
The nutritional values below are based on standard ingredients and serving sizes.
| Nutrient | Amount per Serving |
|---|---|
| Calories | 150 kcal |
| Protein | 5 g |
| Carbohydrates | 25 g |
| Fat | 3 g |
| Fiber | 2 g |
| Sodium | 200 mg |
What To Serve With It
I love finding the perfect side dishes to go with my homemade repeater, like a fresh green salad or roasted veggies. A warm slice of crusty bread pairs so well too, adding a bit of texture and comfort to the meal. Let’s explore some simple, tasty ideas to make your repeater meal even more satisfying.
Side Dishes Ideas
When you’re making a hearty homemade repeater, you’ll want sides that complement its rich flavors without stealing the show. I love pairing it with roasted vegetables like carrots and parsnips, adding a slight sweetness that balances the dish. A simple green salad with a tangy vinaigrette also works wonders, cutting through the richness. Mashed potatoes are my go-to for comfort—fluffy and buttery, they’re perfect for soaking up every bit of flavor. Steamed asparagus adds a fresh, crisp touch. Don’t forget a chilled coleslaw for a bit of crunch. These sides elevate the meal without taking away from the star.
Bread Pairings Tips
Ever wondered what bread works best alongside a homemade repeater? I’ve found crusty baguettes or soft ciabatta are perfect—they soak up the rich flavors without falling apart. For a heartier bite, try sourdough; its tangy taste balances the repeater’s savory notes. If you’re feeling fancy, warm garlic bread adds a delicious kick. My go-to? Buttery dinner rolls—they’re easy to grab and pair well with every bite. Don’t forget cornbread for a sweet contrast, especially if your repeater’s on the spicy side. Experiment and see what you love—it’s all about making each bite even better!